Category Archives: Security

Cloud Native Application Design – Data Security

Security in the cloud can be broadly categorized at the following three levels

  • Infrastructure Security
  • Application Security
  • Data Security

Data Security

  • Encrypt Data at rest and transit: cloud service provider providers mechanism to secure your data at rest and in transit. Encryption is one big tool in your arsenal, for example, a simple step of using HTTPS against HTTP will ensure your data is encrypted and secured while in transit. Similarly, most cloud service providers have encryption available for disks and databases to help secure the data.
  • Data type-specific security: You also need to understand that there will be certain needs specific to the type of data you are storing, for example, if you are storing healthcare-related data, you will need to understand HIPAA (Health Insurance Portability & Accountability Act) needs, for finance-related data you might want to check PCI (Payment Card Industry) data standards. Also, there might be region-specific needs like in Europe we have GDPR or General Data Protection Regulation for personal data.
  • Avoid Weak Encryption: Though most cloud service providers give us options to encrypt our data, filesystems, and disks, it is the responsibility of the architect to make sure strong encryption is implemented. Tools like Key Vault services can help to store encryption keys to avoid manual handling. Also, all your APIs and pages dealing with important data should use HTTPS (Secured) protocol.

Cloud Native Application Design – Application Security

Application Security: When deploying your application in the public cloud, you need to make sure we are taking care of all precautions to safeguard our application from unauthorized access and attacks.

  • Infrastructure as a Code: Avoid accessing resources manually and configuring them, use scripts like terraform, ansible, or cloud-specific options to build infrastructure as a code.
  • No direct access: If a resource is not needed to be available externally, make sure all access is blocked. For example, if a database is to be accessed only by a microservice, give access only to that microservice and block all other access.
  • Automated Deployment: Deployments should not be done manually by actually placing deliverables on target machines manually, automate the process via continuous delivery scripts.
  • Layered Security Approach: When implementing security, most cloud service providers encourage a layered approach. That is, implement security rules at different layers like a load balancer, application server, application code, database, and so on. So that even in case one layer is compromised, your core application and data are still secured.
  • API Security (Authentication / Authorization): All APIs should be behind proper authentication and authorization. Note that a service accessed from the internet will have different security than a service that can only be accessed internally.
  • Common Application Threats: Common attacks like Code Injections, SQL Injections, and Cross-Site Scripting (XSS) can be targeted toward the application. It is the responsibility of the architect and development team to make sure best practices are followed while writing the code to tackle these attacks.
  • Perimeter Layer Attacks: DDOS or Distributed Denial Of Service is a common attack used by hackers to bring an application down. Most cloud service provider gives you out-of-the-box solutions that can help manage these threats.
  • Known Security holes- OWASP: Make sure to understand and take care of common threats like broken access control, inefficient logs, use of old unsecured libraries, etc. https://kamalmeet.com/uncategorized/owasp-top-10-security-threats/
  • Best Practices (API Gateways / Patterns): Use practices like Rate Limit, Circuit breaker, and bulkhead pattern to safeguard your application from attacks. Architectural best practices like API gateway in front of services make sure no direct access to service and also boilerplate responsibilities like security, HTTPS offloading, audit logging, etc can be offloaded from the main service.

Cloud Native Application Design – Infrastructure Security

When talking about security in the cloud, we can broadly categorize it into the following three areas.

  • Infrastructure Security
  • Application Security
  • Data Security

Infrastructure Security

Infrastructure security is about making sure that the infrastructure we are using is accessed only by authorized personnel. This is about both physical and virtual access. An important aspect when it comes to cloud security is understanding that it is a shared responsibility of the public cloud provider and development team.

  • Physical security: At the lowest level of security, one needs to consider the fact that physical machines can be accessed and tampered with. This is more possible when we have on-premise hardware infrastructure than on the cloud. But even when one is choosing a cloud platform, it makes sense to understand and question the level of physical security implemented by the cloud service provider to avoid any unauthorized access. This aspect is handled by the cloud service providers as part of shared responsibility.
  • Virtual access to infrastructure/ Role-based access (RBAC): The next level of access is someone gaining virtual access to the machines manually, programmatically, or through malware. Role-based access to make sure only authorized personnel or code can access data, having security groups and firewalls in place, and making sure security patches and antivirus definitions are always updated can help mitigate this threat.
  • Use Virtual Networks: Create Virtual Networks to group together resources needed by an application. For example, if a service API can only be accessed by an API gateway or a database should only be accessed by a particular microservice, we can make sure these components are in a virtual network and cannot be accessed from the outside world.
  • Manual Errors/ Infrastructure as a Code: A misconfiguration causing a VM exposed through unwanted open ports can be another problem. Implementing infrastructure as a code where automated scripts are responsible for creating and maintaining infrastructure can be helpful in avoiding manual errors.
  • Storage/ Data Access: Who can access a service or a filesystem or a database? What kind of access is required? How can the resources be accessed? One needs to answer these questions before getting started with the application development process. Role-based access is an important tool that can help architects making sure proper security. For example, a user or an application might just need read access on the file system or database, then rules should not allow any read or update access.
  • Audit Tracing: Most cloud service providers allow you to see any changes being done on infrastructure. You can monitor which resources were updated by whom and when. This is an important tool for teams to keep a track of changes.

OWASP Top 10 Security Threats

Here are the top 10 OWASP (Open Web Application Security Project) security threats- https://owasp.org/www-project-top-ten/

Broken Access Control: Proper Access control checks are not implemented at each layer of the application. One example is users can update the API and fetch data they do not have access to, /employee/{Id}, provide an {Id} manually and get the data. Additionally, users can POST, PUT, and DELETE data when they do not have access (because there is no check on the API level). Other Use cases are- when the user is able to manipulate JWT tokens to enhance privilege or CORS misconfiguration allows untrusted origin access.

Cryptographic Failures: Data in transit is not encrypted via HTTPS and TLS. Sensitive data like passwords is not encrypted. Data at rest is not encrypted. Sensitive information is not masked. Not strong enough encryption algorithms.

Injection: Data received is not sanitized for injections. Proper escaping and sanitization are missing in queries. SQL query format not analyzed for injections.

Logs: Ensure log data is encoded correctly. Ensure high-value transactions have an audit trail. Ensure all login, access control, and server-side input validation failures are logged. 

Vulnerable and outdated components: If underlying components or libraries are not kept up to date, this will increase the risk of vulnerabilities in the system.

Identification and Authentication Failure: Handling automated attacks or script attacks. Weak passwords. Not using multifactor authentication. Not invalidating old sessions and tokens.

Security Misconfiguration: Unnecessary ports are kept open, default accounts are not closed, and security patches are not applied.

Software and Data Integrity: Confirm that the data source is correct through a digital signature.

Insecure Design: Best practices like threat modeling are not being followed.

Server Side Request Forgery: Fetching a remote resource without validating the user-supplied URL

JWT Token

Authentication and authorization are the most important security features to be implemented for any API. One way to manage this information is through sessions. Once users log in, a session is created on the server-side for the user with user metadata information. The problem with this approach is that this is stateful and difficult to scale. Another way to implement the metadata is to send back a hash or a key once the user logs in successfully, and every subsequent request needs to pass this key back. This key is stored along with user metadata is stored in the database to avoid statefulness. The disadvantage here is an additional database query, every time a request comes in.

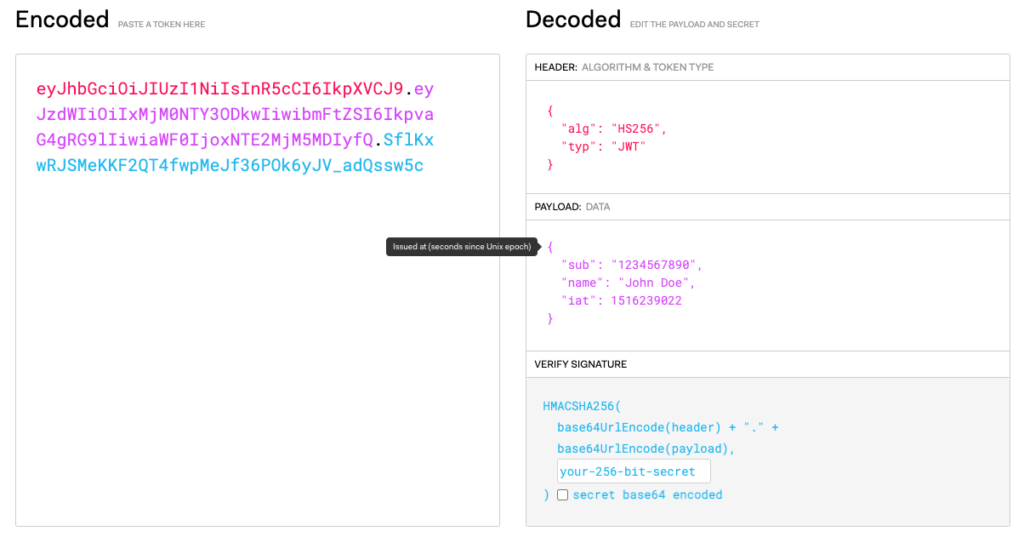
JWT or JSON Web Token solves this problem. JWT is a string in JSON format, encrypted with a key. The encryption can be symmetric or asymmetric. JWT contains 3 sections, a header, a payload, and a signature.

Header: The header JSON normally contains two fields, a type (typ), which is always “JWT” and alg field providing algorithm used for encrypting the token.

{
"alg": "HS256",
"typ": "JWT"
}

Payload: This section contains JSON for any payload or data you want to send. This can contain fields that can identify the user and their roles for authorization and authentication. This can also have iat or Issued At time and token expiry time (exp).

{
"sub": "1234567890",
"name": "John Doe",
"iat": 1516239022
}

Signature: The signature is the encrypted part of the token. The encryption is done using the algorithm mentioned in the header. The signature can only be decrypted using the secret key.

Sample JWT token

Originally posted: https://cloudyforsure.com/security/jwt-token/

HTTPS – the first line of defence

In today’s world when our online interactions are increasing every day, the security of our online transactions becomes very important. If you are an end-user to a website that is required to handle important financial or informational transactions like bank sites, eCommerce sites, email sites, etc, the very basic thing you should check is that protocol for the transaction being used is HTTPS. HTTPS stands for HyperText Transfer Protocol Secure, or Secure appended at the end of the HTTP protocol. For example, if you are using a chrome browser you can see a symbol of a lock at the start of the website name in the address bar indicating the site uses HTTPS. If you click on the lock symbol you will see more details about the certificate provided by the website claiming that it is secure.

Let’s try to understand how HTTPS works.

Step 1: Browser sends a request for an https secured page, like https://google.com

Step 2: The website will need to send back an SSL certificate confirming that it is secured. SSL certificate is provided by certifying authorities like Godaddy which can be verified by the browser. Along with the certificate, the website would send the browser its public key.

Step 3: Once the browser receives the certificate and public key from the website, it will authenticate the certificate, and if satisfied, it will use the public key from the browser to create a symmetric key.

Step 4: The browser generates a symmetric key, encrypts it using the public key provided by the website server and sends it back to the server. The web server receives the encrypted symmetric key, decrypts it using its private key.

Step 5: For any further communication, the server and the browser both use this symmetric key.

Now to understand the concept completely we need to understand how public-private key encryption is different from symmetric key encryption. In the case of symmetric key encryption, the key that encrypts the message can be used to decrypt the message. Whereas in the case of Public key – Private Key encryption, a message encrypted by Public key can only be decrypted by the private key. Symmetric key encryption is faster but not as secured as public-private key encryption.

If you are interested in understanding how each step mentioned above assures security in communication, read on.

Let’s look at each step and try to understand how each step is secured.

Step 1: The browser is just sending a request for website contents at this point, the actual transfer of information is not started.

Step 2: The server is only sharing its public key in this step, so not worried about security.

Step 3: Browser decrypts the SSL certificate which needs to be provided by an authorized Certification Authority (CA). The browsers come packaged with details of all major CAs and can validate the certificate against its local cache or can confirm with the certification authority. Browser matches the URL being addressed and the certificate received, this way it makes sure that no fake website or server is trying to send the data.

Step 4: The browser has encrypted the symmetric key with the public key provided by the server. So in case even if the packet is compromised and received by a fake server, it will not be able to decrypt the message as only the original server has the private key.

Step 5: By this step, only the browser and the intended server have the symmetric key. Any communication happening can be decrypted by only these two parties, so even if there is a leak, the message content remains safe.

How to check if a port is open on a server?

I wanted to check if the service I am trying to access on a server is actually listening on the port I am hitting. I tried to look for a ping variant which could tell me if the port is listening and required service is up and running.

Found nmap command as answer.

nmap -p 80 google.com

Starting Nmap 6.40 ( http://nmap.org ) at 2016-03-02 16:05 IST
Nmap scan report for google.com (216.58.197.78)
Host is up (0.050s latency).
rDNS record for 216.58.197.78: maa03s21-in-f14.1e100.net
PORT STATE SERVICE
80/tcp open http

It checks the port state and also what service is listening at the port.

Spring Security- with Java Configuration

Recently I wrote about getting started with Spring Security. In that, I used XML configurations for spring security. As a Java developer, I normally prefer Java configuration with Spring than XML. So here is how we can move from XML configuration to Java configuration.

Firstly I tell my web.xml that I want to use Java file based configuration and provide configuration class.

<?xml version="1.0" encoding="ISO-8859-1" ?>

<web-app xmlns="http://java.sun.com/xml/ns/j2ee" xmlns:xsi="http://www.w3.org/2001/XMLSchema-instance"
    xsi:schemaLocation="http://java.sun.com/xml/ns/j2ee http://java.sun.com/xml/ns/j2ee/web-app_2_4.xsd"
    version="2.4">

    <context-param>
        <param-name>contextClass</param-name>
        <param-value>org.springframework.web.context.support.AnnotationConfigWebApplicationContext</param-value>
    </context-param>
    <context-param>
        <param-name>spring.profiles.active</param-name>
        <param-value>javaee</param-value>
    </context-param>
    <context-param>
        <param-name>contextConfigLocation</param-name>
        <param-value>com.myapp.config.MyConfig</param-value>
    </context-param>


    <listener>
        <listener-class>org.springframework.web.context.ContextLoaderListener</listener-class>
    </listener>

    <filter>
        <filter-name>springSecurityFilterChain</filter-name>
        <filter-class>org.springframework.web.filter.DelegatingFilterProxy</filter-class>
    </filter>
    <filter-mapping>
        <filter-name>springSecurityFilterChain</filter-name>
        <url-pattern>/*</url-pattern>
        <dispatcher>ERROR</dispatcher>
        <dispatcher>REQUEST</dispatcher>
    </filter-mapping>

    <servlet>
        <servlet-name>dispatcherServlet</servlet-name>
        <servlet-class>org.springframework.web.servlet.DispatcherServlet</servlet-class>
        <init-param>
            <param-name>contextClass</param-name>
            <param-value>org.springframework.web.context.support.AnnotationConfigWebApplicationContext</param-value>
        </init-param>
        <init-param>
            <param-name>contextConfigLocation</param-name>
            <param-value>com.myapp.config.MyConfig</param-value>
        </init-param>
        <load-on-startup>1</load-on-startup>
    </servlet>

    <servlet-mapping>
        <servlet-name>dispatcherServlet</servlet-name>
        <url-pattern>/service/*</url-pattern>
    </servlet-mapping>

</web-app>

Here is a simple contoller path which I need to secure

package com.myapp.test;

import java.io.IOException;

import javax.servlet.ServletException;

import org.springframework.stereotype.Controller;
import org.springframework.web.bind.annotation.PathVariable;
import org.springframework.web.bind.annotation.RequestMapping;
import org.springframework.web.bind.annotation.RequestMethod;
import org.springframework.web.servlet.ModelAndView;

@Controller
@RequestMapping("/sample")
public class SampleService {
	@RequestMapping(method = RequestMethod.GET, value = "/hello")
	public ModelAndView LepService(@PathVariable("id") String id)
			throws ServletException, IOException {

		ModelAndView mv = new ModelAndView("hello");
		// Do something here
		return mv;
	}
}

As you can see this simply redirects to hello view (hello.jsp).

And here the configuration file.

@Configuration
@EnableWebMvc
@EnableWebSecurity
@ComponentScan(basePackages = "com.myapp.test")
public class MyConfig extends WebSecurityConfigurerAdapter {

	@Bean
	public UrlBasedViewResolver urlBasedViewResolver() {
		UrlBasedViewResolver res = new InternalResourceViewResolver();
		res.setViewClass(JstlView.class);
		res.setPrefix("/WEB-INF/");
		res.setSuffix(".jsp");

		return res;
	}

	@Override
	public void configure(WebSecurity web) throws Exception {
		web.ignoring().antMatchers("/resources/**");
	}

	@Autowired
	public void configureGlobal(AuthenticationManagerBuilder auth)
			throws Exception {
		auth.inMemoryAuthentication().withUser("user").password("password")
				.roles("USER");
	}

	@Override
	protected void configure(HttpSecurity http) throws Exception {
		http.authorizeRequests().antMatchers("/").permitAll()
				.antMatchers("/sample/**").hasRole("USER").anyRequest().authenticated()
				.and().formLogin();
	}
}

Spring Security- Getting started

In last post I wrote about implementing a simple authentication and authorization code using filters to provide security to your web application.

Well, Spring security is there to make our life easier.

Lets take a very simple example of hello world application.

Simply create a new web application (in eclipse dynamic web application, cover to maven application to use maven).

Modify Web.xml

<servlet>
<servlet-name>controlServlet</servlet-name>
<servlet-class>com.spring.test.HelloWorld</servlet-class>
</servlet>

<servlet-mapping>
<servlet-name>controlServlet</servlet-name>
<url-pattern>/*</url-pattern>
</servlet-mapping>

And create HelloWorld.java

package com.spring.test;
import java.io.IOException;
import javax.servlet.annotation.WebServlet;
import javax.servlet.http.HttpServlet;
import javax.servlet.http.HttpServletRequest;
import javax.servlet.http.HttpServletResponse;


@WebServlet (urlPatterns ={"/hello" } )
public class HelloWorld extends HttpServlet {

@Override
public void doGet (HttpServletRequest request , HttpServletResponse response){
try {
response.getWriter( ).write( "Hello World" ) ;
} catch(IOException e) {
e.printStackTrace( ) ;
}
}
}

Only dependency added to maven

<dependency>
<groupId>javax.servlet</groupId>
<artifactId>javax.servlet-api</artifactId>
<version>3.0.1</version>
</dependency>

Build using maven and execute on any webserver. The /hello url will show a Hello World Message.

Lets add some security to this application now using Spring Security.

Tell your maven about Spring Jars

<dependency>
<groupId>org.springframework.security</groupId>
<artifactId>spring-security-core</artifactId>
<version>3.1.3.RELEASE</version>
</dependency>
<dependency>
<groupId>org.springframework.security</groupId>
<artifactId>spring-security-config</artifactId>
<version>3.1.3.RELEASE</version>
</dependency>
<dependency>
<groupId>org.springframework.security</groupId>
<artifactId>spring-security-web</artifactId>
<version>3.1.3.RELEASE</version>
</dependency>
<dependency>
<groupId>commons-logging</groupId>
<artifactId>commons-logging</artifactId>
<version>1.1.1</version>
</dependency>

Add to web.xml

<listener>
<listener-class>
org.springframework.web.context.ContextLoaderListener
</listener-class>
</listener>
<context-param>
<param-name>contextConfigLocation</param-name>
<param-value>
/WEB-INF/spring-security.xml
</param-value>
</context-param>

<filter>
<filter-name>springSecurityFilterChain</filter-name>
<filter-class>
org.springframework.web.filter.DelegatingFilterProxy
</filter-class>
</filter>
<filter-mapping>
<filter-name>springSecurityFilterChain</filter-name>
<url-pattern>/*</url-pattern>
</filter-mapping>

And create spring-security.xml inside WEB-INF

<?xml version="1.0" encoding="UTF-8"?>
<beans xmlns="http://www.springframework.org/schema/beans"
xmlns:security="http://www.springframework.org/schema/security"
xmlns:xsi="http://www.w3.org/2001/XMLSchema-instance"
xsi:schemaLocation="http://www.springframework.org/schema/beans
http://www.springframework.org/schema/beans/spring-beans-3.0.xsd
http://www.springframework.org/schema/security
http://www.springframework.org/schema/security/spring-security-3.1.xsd">
<security:http auto-config="true">
<security:intercept-url pattern="/hello" access="ROLE_ADMIN" />
</security:http>
<security:authentication-manager>
<security:authentication-provider>
<security:user-service>
<security:user authorities="ROLE_ADMIN" name="kamal" password="kamal" />
<security:user authorities="ROLE_ADMIN" name="admin" password="admin" />
</security:user-service>
</security:authentication-provider>
</security:authentication-manager>
</beans>