Category Archives: Spring

Getting started with Spring Boot

This is a short tutorial about creating a simple REST webservice with spring boot. This assumes you have basic knowledge of Spring and Java.

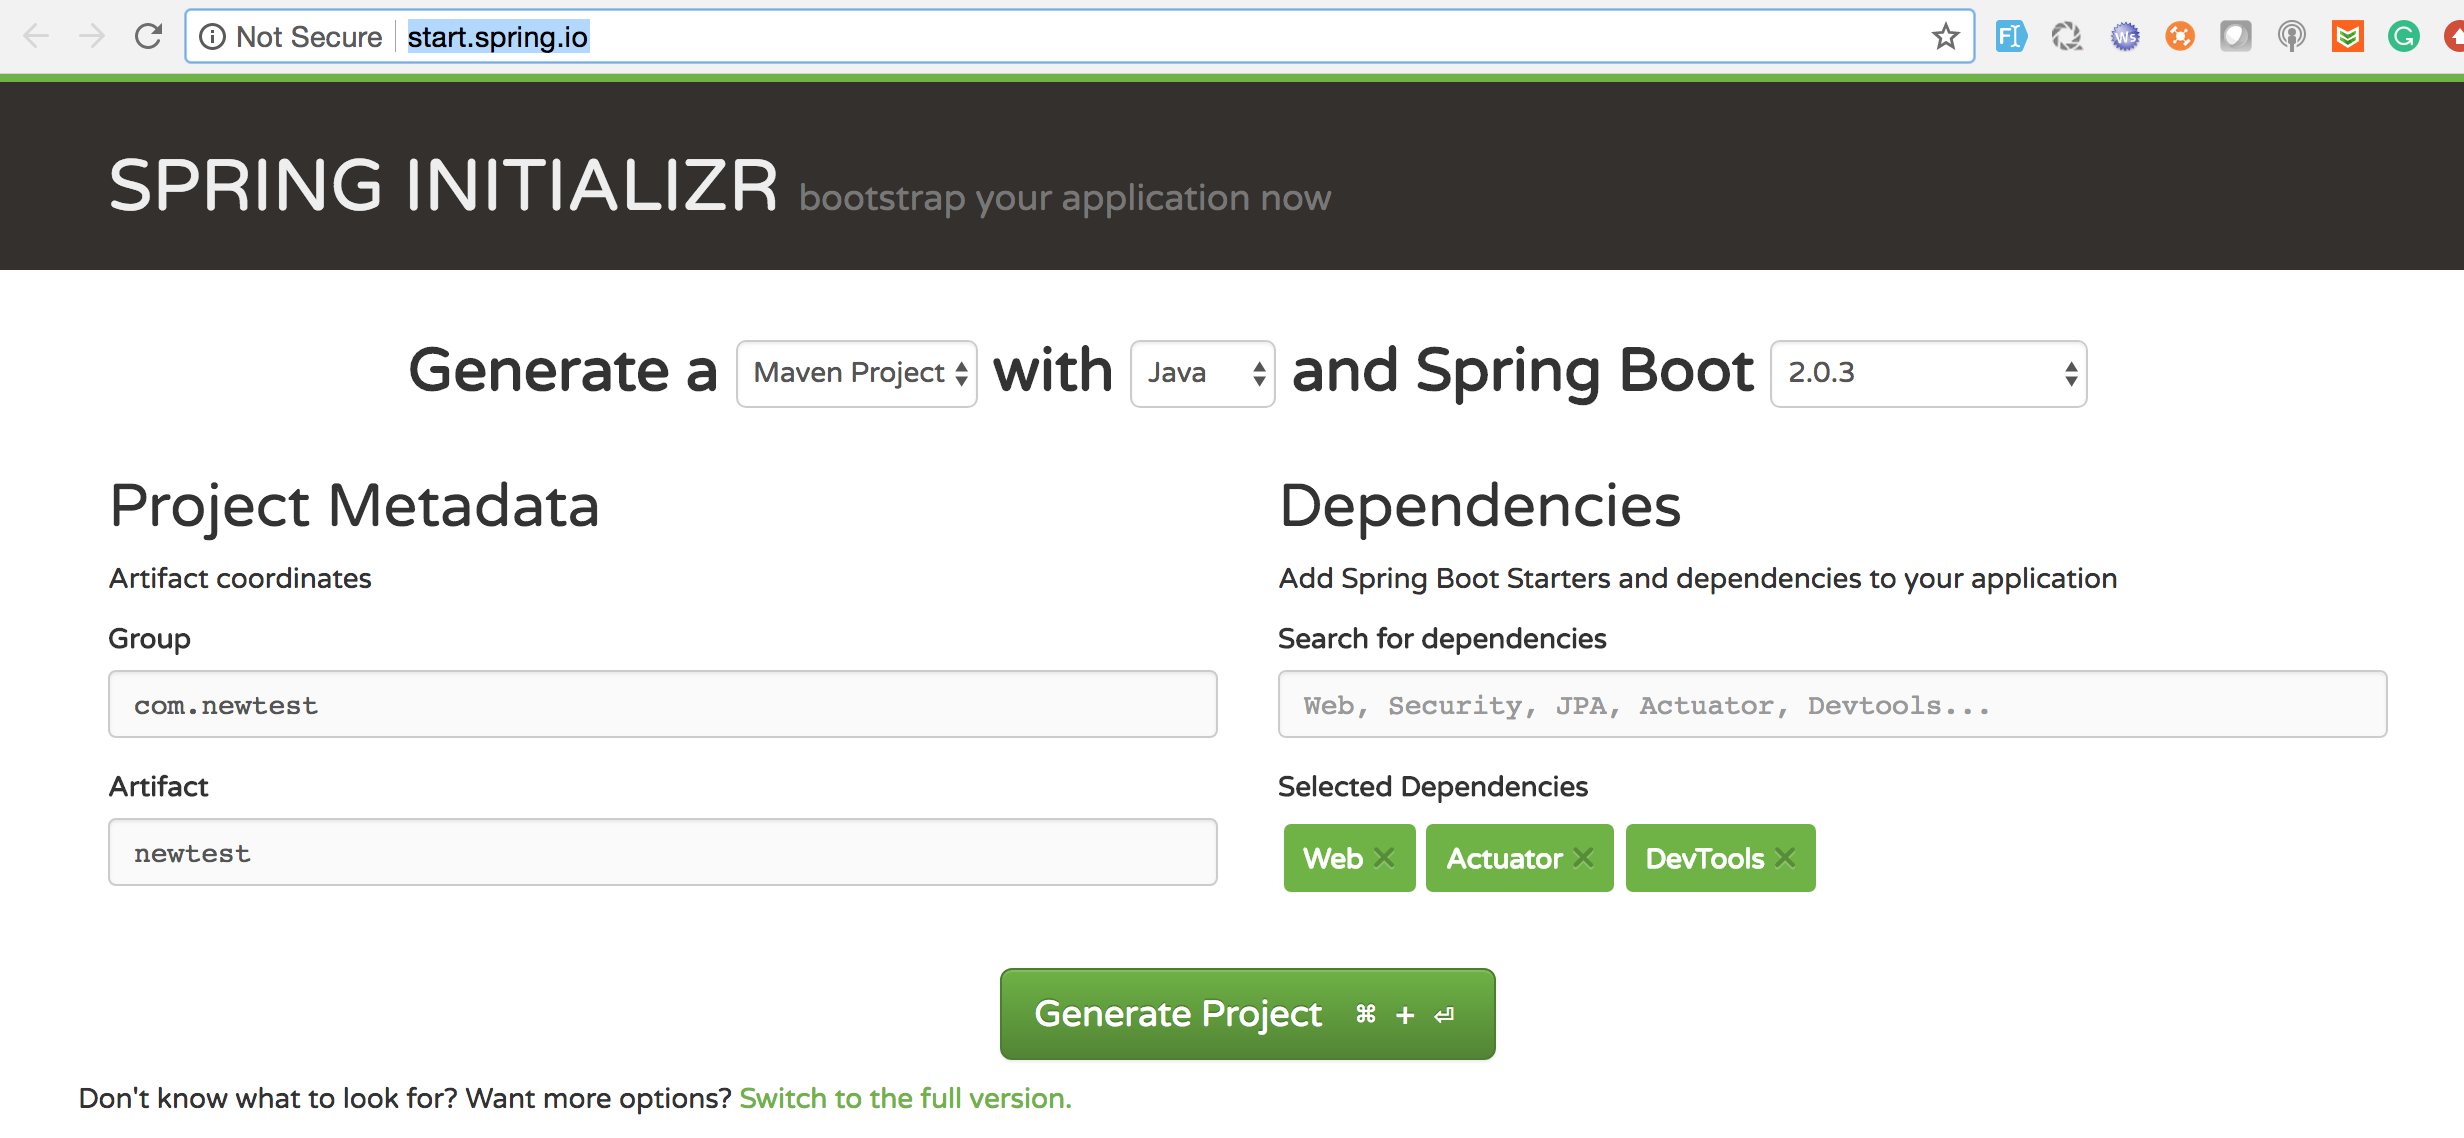
To get started we will create a Spring project. The simplest way to do this is to go to http://start.spring.io/ and create a project.

This will give us a blank project on which we can build upon. Import the project as Maven project to Eclipse or any other ID. By default, it will provide a class which will look like

@SpringBootApplication
public class NewtestApplication {

	public static void main(String[] args) {
		SpringApplication.run(NewtestApplication.class, args);
	}
}

As you can see this is the main class and all the execution starts here. Also, note the @SpringBootApplication annotation. Spring documentation states that

“The @SpringBootApplication annotation is equivalent to using @Configuration, @EnableAutoConfiguration, and @ComponentScan with their default attributes”

For this example, we will keep it simple and introduce a controller

@RestController
public class HelloController {
	
	@GetMapping("/sayhello")
	public String sayHello() {
		return("Hello");
	}
}

Finally, Run the main class as a normal Java application, it will automatically start the Spring Boot server at 8080.

We can now access our application at http://localhost:8080/sayhello

Inject Or Autowired

Sometimes in a Spring framework code, we see the keywords @Inject and @Autowired being used interchangeably. Simply putting it @Autowired is Spring specific annotation for implementing Dependency Injection, whereas @Inject is part of Java EE 6 specification, hence more generic.

JSR 299, Java EE 6 specification, provided a feature called Contexts and Dependency Injection (CDI). http://docs.oracle.com/javaee/6/tutorial/doc/giwhb.html.

JSR 330, more specifically talks about Dependency Injection. https://dzone.com/articles/what-relation-betwe-there

A more elaborated explanation on usage of various DI annotations – http://blogs.sourceallies.com/2011/08/spring-injection-with-resource-and-autowired/#more-2350

Using Mockito with Spring

Junit testing is an integral part of unit testing while developing any application. It makes sense at times to separate out testing of Business layer from DAO layer to avoid generation of test data everytime or may be DAO layer is being developed independently.

Frameworks like Mockito or Easymock comes handy when dealing with such situations where you only want to test one class or one method and mock any other dependencies by dummy objects.

Here is a simple example


@RunWith(MockitoJUnitRunner.class)
public class UserManagerTest{
	private static final String userName="kamal";
	
	@InjectMocks
	private UserManager userManager=new UserManager();
	
	@Mock
	private UserDAO userDAO;
	

	@Before
	public void initMocks() {
		MockitoAnnotations.initMocks(this);
	}
	
	//Remove the Ignore tag to execute the test case
	@Ignore
	@Test
	public void addUserTest()
	{
		try {
		
			Mockito.doNothing().when(userDAO).insertUser(userName);
			Mockito.when(userDAO.getUserDependencies(userId)).thenReturn(new UserDependencies("temp"));
			
			userManager.addUser(userName);
		} catch (Exception e) {
			fail("Test case failed");
			// TODO Auto-generated catch block
			e.printStackTrace();
		}
	}
	

}

We are calling userManager.addUser(userName), but at the same time we are telling JUnit to do nothing (do not call the DAO layer), when you see this call to avoid data insertion. In addition there is another method which will check user dependencies (may be after adding user it check if there are some default depenedencies), where we tell Junit to instead of calling real DAO method and fecthing an objects, lets return a dummy object.

Mybatis- Using SelectProvider and ResultMap

I recently wrote about how a basic mybatis application can be set with Spring.

But there are situations when queries can be a bit complex than a simple insert or select. In such cases

@SelectProvider

can help us build a dynamic query.

For example, in my user mapper, I need to search based on Id OR status.

@SelectProvider(type = UserSQLBuilder.class, method = "getUsersProvider") 
@ResultMap(MyConfig.USER_MAP)
public List searchUser(@Param("id") String id,@Param("status")  String status);

My UserSQLBuilder class would have a method called getUsersProvider which will create a dynamic query based on paramaters I am passing here.

public class UserSQLBuilder {

	public String getUsersProvider(Map parameters) {
		
		String id = (String) parameters.get("id");
		String status = (String) parameters.get("status");
		
		StringBuilder query = new StringBuilder();
		query.append("select id, user_name, user_address, status from users");
		if (status.equals("NA") && !id.equals("NA")) {
			query.append(" where id like '%" + id + "%'");
		} else if (!status.equals("NA") && id.equals("NA")) {
			query.append(" where status ='" + status + "'");
	        return query.toString();
	}
}

Another important thing to note here is that I am using @ResultMap to map result of query to my User (List) object. If we look at the query, it returns user_name, user_address etc. Whereas in my User class I have userName, userAddress and so on. The challenge is to map query values to object values.

There are actually multiple ways.

1. I can simply modify my query – select user_name as userName, user_address as userAddress from users.
2. Explicitly tell my mapper to map the values from column to object like

@SelectProvider(type = UserSQLBuilder.class, method = "getUsersProvider") 
@Results({ @Result(property = "userName", column = "user_name"),
@Result(property = "userAddress", column = "user_address") })
public List searchUser(@Param("id") String id,@Param("status")  String status);

3. Create a @ResultMap which can be reused, useful in cases when same mapping has to be done more than once.
@ResultMap(MyConfig.USER_MAP)
statement tells the mapper to look for a map in config file.

in MyConfig.java, I will define

public static final String REPORT_MAP = "com.test.mapper.UserMapper.user";
//code here

private void registerUserMap(org.apache.ibatis.session.Configuration config) {
		// registering result maps
		List flags = new ArrayList();
		List resultMappings = new ArrayList();
		flags.add(ResultFlag.ID);

		org.apache.ibatis.mapping.ResultMapping.Builder resultBuilder = new org.apache.ibatis.mapping.ResultMapping.Builder(
				config, "userName", "user_name", String.class);
		resultBuilder.flags(flags);
		resultMappings.add(resultBuilder.build());

		resultBuilder = new org.apache.ibatis.mapping.ResultMapping.Builder(config, "userAddess",
				"user_address", String.class);
		resultBuilder.flags(flags);
		resultMappings.add(resultBuilder.build());

		Builder resultMapBuilder = null;
		resultMapBuilder = new Builder(config, "com.gcp.dao.mapper.ReportMapper.report", Report.class, resultMappings, true);
		config.addResultMap(resultMapBuilder.build());
	
	}

And while defining my session factory, I will register this Map.

 @Bean
		public SqlSessionFactory sqlSessionFactory() throws Exception {
			org.apache.ibatis.mapping.Environment environment = new org.apache.ibatis.mapping.Environment("",
					new JdbcTransactionFactory(), getDataSource());
			org.apache.ibatis.session.Configuration config = new org.apache.ibatis.session.Configuration(environment);

			registerReportMap(config);

			return new SqlSessionFactoryBuilder().build(config);
		}

Using Mybatis with Spring

Mybatis is Java Persistence framework, build upn JDBC. I look at it mostly as a bridge between conventional JDBC and an ORM solution like hibernate. The flexibility Mybatis provide is to write queries similar to JDBC, yet takes away all the complexity and boilerplate code for creating and maintaining connections and transactions. It can also map your objects to Tables like ORM solution, without getting into complexities of an ORM fraework, but at a cost of some additional code.

Mappers: Mappers are core of Mybatis implementation. A Mapper class would contain queries to be executed by mybatis. A good practice is to create a mapper for each table in database.

Here is a simple Mapper class

public interface UserMapper {

	/**
	 * This method validates the credentials for any user.
	 * 
	 * @param userName
	 * @param password
	 * @return
	 */
	@Select("select id from myuser where username=#{userName} and password=#{password}")
	public Integer verifyAdminUser(@Param("userName") String userName,
			@Param("password") String password);

	/**
	 * This method returns list of all users.
	 * 
	 * @return
	 */
	@Select("select username, password from myuser")
	public List getUsers();

In the getUsers method, you can see mybatis will automatically convert the results into a Java List with User objects.

Coming to Setting up Mybatis with Spring, if you are using Java based configuration, all you need to add is

@MapperScan("com.test.mapper")

and tell location of your mappers package(s).

In addition you would want spring to manage transactions for you by

@MapperScan("com.test.mapper")
public class MyConfig implements TransactionManagementConfigurer{

//JNDI lookup for database
private DataSource getDataSource() {
		InitialContext ic;
		DataSource ds = null;
		try {
			ic = new InitialContext();
			String jndiName ="jndi";
			ds = (DataSource) ic.lookup(jndiName);
		} 
		catch(Exception e)
		{
			e.printStackTrace();
		}
		return ds;
	}

	 @Bean
		public SqlSessionFactory sqlSessionFactory() throws Exception {
			org.apache.ibatis.mapping.Environment environment = new org.apache.ibatis.mapping.Environment("",
					new JdbcTransactionFactory(), getDataSource());
			org.apache.ibatis.session.Configuration config = new org.apache.ibatis.session.Configuration(environment);

			return new SqlSessionFactoryBuilder().build(config);
		}
	@Override
	public PlatformTransactionManager annotationDrivenTransactionManager() {
		return  new DataSourceTransactionManager(getDataSource());
	}

You are all set to use Mappers just by Autowiring in any class.

Spring Security- with Java Configuration

Recently I wrote about getting started with Spring Security. In that, I used XML configurations for spring security. As a Java developer, I normally prefer Java configuration with Spring than XML. So here is how we can move from XML configuration to Java configuration.

Firstly I tell my web.xml that I want to use Java file based configuration and provide configuration class.

<?xml version="1.0" encoding="ISO-8859-1" ?>

<web-app xmlns="http://java.sun.com/xml/ns/j2ee" xmlns:xsi="http://www.w3.org/2001/XMLSchema-instance"
    xsi:schemaLocation="http://java.sun.com/xml/ns/j2ee http://java.sun.com/xml/ns/j2ee/web-app_2_4.xsd"
    version="2.4">

    <context-param>
        <param-name>contextClass</param-name>
        <param-value>org.springframework.web.context.support.AnnotationConfigWebApplicationContext</param-value>
    </context-param>
    <context-param>
        <param-name>spring.profiles.active</param-name>
        <param-value>javaee</param-value>
    </context-param>
    <context-param>
        <param-name>contextConfigLocation</param-name>
        <param-value>com.myapp.config.MyConfig</param-value>
    </context-param>


    <listener>
        <listener-class>org.springframework.web.context.ContextLoaderListener</listener-class>
    </listener>

    <filter>
        <filter-name>springSecurityFilterChain</filter-name>
        <filter-class>org.springframework.web.filter.DelegatingFilterProxy</filter-class>
    </filter>
    <filter-mapping>
        <filter-name>springSecurityFilterChain</filter-name>
        <url-pattern>/*</url-pattern>
        <dispatcher>ERROR</dispatcher>
        <dispatcher>REQUEST</dispatcher>
    </filter-mapping>

    <servlet>
        <servlet-name>dispatcherServlet</servlet-name>
        <servlet-class>org.springframework.web.servlet.DispatcherServlet</servlet-class>
        <init-param>
            <param-name>contextClass</param-name>
            <param-value>org.springframework.web.context.support.AnnotationConfigWebApplicationContext</param-value>
        </init-param>
        <init-param>
            <param-name>contextConfigLocation</param-name>
            <param-value>com.myapp.config.MyConfig</param-value>
        </init-param>
        <load-on-startup>1</load-on-startup>
    </servlet>

    <servlet-mapping>
        <servlet-name>dispatcherServlet</servlet-name>
        <url-pattern>/service/*</url-pattern>
    </servlet-mapping>

</web-app>

Here is a simple contoller path which I need to secure

package com.myapp.test;

import java.io.IOException;

import javax.servlet.ServletException;

import org.springframework.stereotype.Controller;
import org.springframework.web.bind.annotation.PathVariable;
import org.springframework.web.bind.annotation.RequestMapping;
import org.springframework.web.bind.annotation.RequestMethod;
import org.springframework.web.servlet.ModelAndView;

@Controller
@RequestMapping("/sample")
public class SampleService {
	@RequestMapping(method = RequestMethod.GET, value = "/hello")
	public ModelAndView LepService(@PathVariable("id") String id)
			throws ServletException, IOException {

		ModelAndView mv = new ModelAndView("hello");
		// Do something here
		return mv;
	}
}

As you can see this simply redirects to hello view (hello.jsp).

And here the configuration file.

@Configuration
@EnableWebMvc
@EnableWebSecurity
@ComponentScan(basePackages = "com.myapp.test")
public class MyConfig extends WebSecurityConfigurerAdapter {

	@Bean
	public UrlBasedViewResolver urlBasedViewResolver() {
		UrlBasedViewResolver res = new InternalResourceViewResolver();
		res.setViewClass(JstlView.class);
		res.setPrefix("/WEB-INF/");
		res.setSuffix(".jsp");

		return res;
	}

	@Override
	public void configure(WebSecurity web) throws Exception {
		web.ignoring().antMatchers("/resources/**");
	}

	@Autowired
	public void configureGlobal(AuthenticationManagerBuilder auth)
			throws Exception {
		auth.inMemoryAuthentication().withUser("user").password("password")
				.roles("USER");
	}

	@Override
	protected void configure(HttpSecurity http) throws Exception {
		http.authorizeRequests().antMatchers("/").permitAll()
				.antMatchers("/sample/**").hasRole("USER").anyRequest().authenticated()
				.and().formLogin();
	}
}

Spring Security- Getting started

In last post I wrote about implementing a simple authentication and authorization code using filters to provide security to your web application.

Well, Spring security is there to make our life easier.

Lets take a very simple example of hello world application.

Simply create a new web application (in eclipse dynamic web application, cover to maven application to use maven).

Modify Web.xml

<servlet>
<servlet-name>controlServlet</servlet-name>
<servlet-class>com.spring.test.HelloWorld</servlet-class>
</servlet>

<servlet-mapping>
<servlet-name>controlServlet</servlet-name>
<url-pattern>/*</url-pattern>
</servlet-mapping>

And create HelloWorld.java

package com.spring.test;
import java.io.IOException;
import javax.servlet.annotation.WebServlet;
import javax.servlet.http.HttpServlet;
import javax.servlet.http.HttpServletRequest;
import javax.servlet.http.HttpServletResponse;


@WebServlet (urlPatterns ={"/hello" } )
public class HelloWorld extends HttpServlet {

@Override
public void doGet (HttpServletRequest request , HttpServletResponse response){
try {
response.getWriter( ).write( "Hello World" ) ;
} catch(IOException e) {
e.printStackTrace( ) ;
}
}
}

Only dependency added to maven

<dependency>
<groupId>javax.servlet</groupId>
<artifactId>javax.servlet-api</artifactId>
<version>3.0.1</version>
</dependency>

Build using maven and execute on any webserver. The /hello url will show a Hello World Message.

Lets add some security to this application now using Spring Security.

Tell your maven about Spring Jars

<dependency>
<groupId>org.springframework.security</groupId>
<artifactId>spring-security-core</artifactId>
<version>3.1.3.RELEASE</version>
</dependency>
<dependency>
<groupId>org.springframework.security</groupId>
<artifactId>spring-security-config</artifactId>
<version>3.1.3.RELEASE</version>
</dependency>
<dependency>
<groupId>org.springframework.security</groupId>
<artifactId>spring-security-web</artifactId>
<version>3.1.3.RELEASE</version>
</dependency>
<dependency>
<groupId>commons-logging</groupId>
<artifactId>commons-logging</artifactId>
<version>1.1.1</version>
</dependency>

Add to web.xml

<listener>
<listener-class>
org.springframework.web.context.ContextLoaderListener
</listener-class>
</listener>
<context-param>
<param-name>contextConfigLocation</param-name>
<param-value>
/WEB-INF/spring-security.xml
</param-value>
</context-param>

<filter>
<filter-name>springSecurityFilterChain</filter-name>
<filter-class>
org.springframework.web.filter.DelegatingFilterProxy
</filter-class>
</filter>
<filter-mapping>
<filter-name>springSecurityFilterChain</filter-name>
<url-pattern>/*</url-pattern>
</filter-mapping>

And create spring-security.xml inside WEB-INF

<?xml version="1.0" encoding="UTF-8"?>
<beans xmlns="http://www.springframework.org/schema/beans"
xmlns:security="http://www.springframework.org/schema/security"
xmlns:xsi="http://www.w3.org/2001/XMLSchema-instance"
xsi:schemaLocation="http://www.springframework.org/schema/beans
http://www.springframework.org/schema/beans/spring-beans-3.0.xsd
http://www.springframework.org/schema/security
http://www.springframework.org/schema/security/spring-security-3.1.xsd">
<security:http auto-config="true">
<security:intercept-url pattern="/hello" access="ROLE_ADMIN" />
</security:http>
<security:authentication-manager>
<security:authentication-provider>
<security:user-service>
<security:user authorities="ROLE_ADMIN" name="kamal" password="kamal" />
<security:user authorities="ROLE_ADMIN" name="admin" password="admin" />
</security:user-service>
</security:authentication-provider>
</security:authentication-manager>
</beans>

Spring: RestController vs Controller

Spting MVC provides us with annotation controller which tells Spring contailner that this class is a specialized component which will act as a controller.

To make REST support easy in Spring, it has added a @RestController annotation which is combination of @Contoller and @ResponseBody (Annotation that indicates a method return value should be bound to the web response body.).

http://stackoverflow.com/questions/25242321/difference-between-spring-controller-and-restcontroller-annotation
http://docs.spring.io/spring-framework/docs/current/javadoc-api/org/springframework/web/bind/annotation/RestController.html
http://docs.spring.io/spring-framework/docs/current/javadoc-api/org/springframework/stereotype/Controller.html

Inversion of Control: Dependency Injection vs Dependency Lookup

Inversion of Control is a principle which recommends moving unwanted responsibilities out of a class and letting the class focus on core responsibilities, hence providing loose coupling.

There are two basic ways in Java to provide IOC- Dependency Injection and Dependency lookup.

As the name suggest, Dependency Injection is where the dependency is injected from outside the class, and class is not worried about details – http://kamalmeet.com/coding/more-on-dependency-injection/

Dependency lookup is where class itself looks up for dependency and chooses appropriate implementation. Use of JNDI lookup for proper bean of datasource is a good example.

InitialContext ic = new InitialContext();
DataSource ds = (DataSource) ic.lookup(“jndiName”);

Using Java class based configuration with Spring

In last few posts about Sring, I have used XML based configuration. But offlate I have figured out that it is easier to use Java based configuration. Here is how it is done for a simple spring mvc application

1. Firstly you will tell web.xml that you will use which class for configuring spring

<servlet>
<servlet-name>dispatcherServlet</servlet-name>
<servlet-class>org.springframework.web.servlet.DispatcherServlet</servlet-class>
<init-param>
<param-name>contextClass</param-name>
<param-value>org.springframework.web.context.support.AnnotationConfigWebApplicationContext</param-value>
</init-param>
<init-param>
<param-name>contextConfigLocation</param-name>
<param-value>com.myapp.config.MyConfig</param-value>
</init-param>
<load-on-startup>1</load-on-startup>
</servlet>

<servlet-mapping>
<servlet-name>dispatcherServlet</servlet-name>
<url-pattern>/app/*</url-pattern>
</servlet-mapping>

2. You will mark your class with annotation @Configuration

3. For MVC application @EnableWebMvc

4. For component scan- to tell your spring application where to find compoenent @ComponentScan(basePackages = “com.app.my com.app.service com.app.aspect”)

5. If you are using AOP @EnableAspectJAutoProxy

So a sample file would look like

@Configuration
@EnableAspectJAutoProxy
@EnableWebMvc
@ComponentScan(basePackages = "com.app.my com.app.service com.app.aspect")
public class MyConfig extends WebMvcConfigurerAdapter {


	@Bean
	public UrlBasedViewResolver urlBasedViewResolver() {
		UrlBasedViewResolver res = new InternalResourceViewResolver();
		res.setViewClass(JstlView.class);
		res.setPrefix("/WEB-INF/");
		res.setSuffix(".jsp");

		return res;
	}

	@Override
	public void addResourceHandlers(final ResourceHandlerRegistry registry) {

		registry.addResourceHandler("/fonts/**")
				.addResourceLocations("/fonts/").setCachePeriod(31556926);
		registry.addResourceHandler("/css/**").addResourceLocations("/css/")
				.setCachePeriod(31556926);
		registry.addResourceHandler("/images/**")
				.addResourceLocations("/images/").setCachePeriod(31556926);
		registry.addResourceHandler("/js/**").addResourceLocations("/js/")
				.setCachePeriod(31556926);
	}


	@Bean
	public CommonsMultipartResolver multipartResolver() {
		CommonsMultipartResolver mr = new CommonsMultipartResolver();
		mr.setMaxUploadSize(50000000);
		return mr;
	}


}