Tag Archives: AWS

Amazon CloudWatch

Once your application is deployed to production, monitoring is the only friend that can help you avoid embarrassing situations like a service not responding or an application is running very slow. You would like to make sure that monitoring and alerting systems are in place so that before you start hearing complaints from your end users, you can know about the problem and fix it. You would also like to make sure automated systems are in place to handle such issues.

Amazon CloudWatch is a service provided by AWS which can help us add monitoring for AWS resources.

image source https://docs.aws.amazon.com/AmazonCloudWatch/latest/monitoring/cloudwatch_architecture.html

Let’s try to understand the above design. AWS services publish data to cloud watch in the form of metrics. Metrics here contain time-ordered data for various aspects, like CPU usage. Cloud watch processes the data and is capable of showing that in the form of graphs and bars. One can also set alarms on certain events like CPU usage goes beyond 75%. Based on alarm action can be taken like sending an email notification to admins or autoscale the application by adding an additional server to reduce CPU usage. One can also publish additional application data to CloudWatch for monitoring.

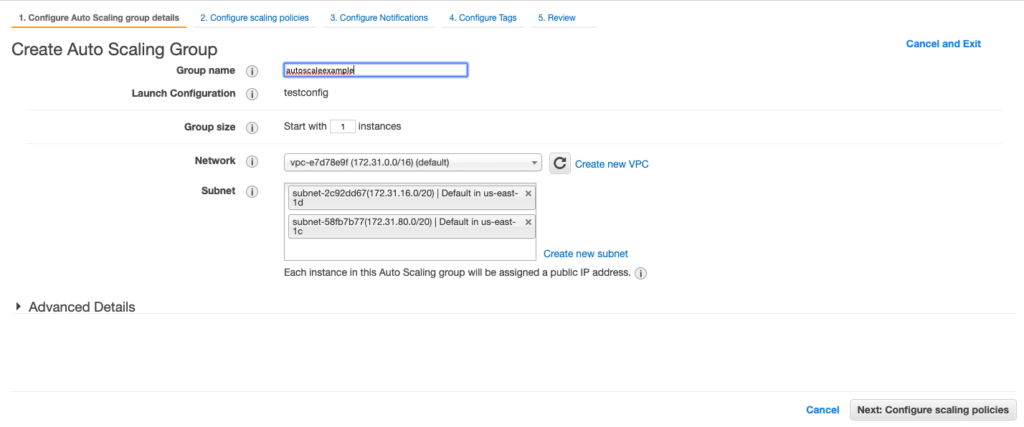
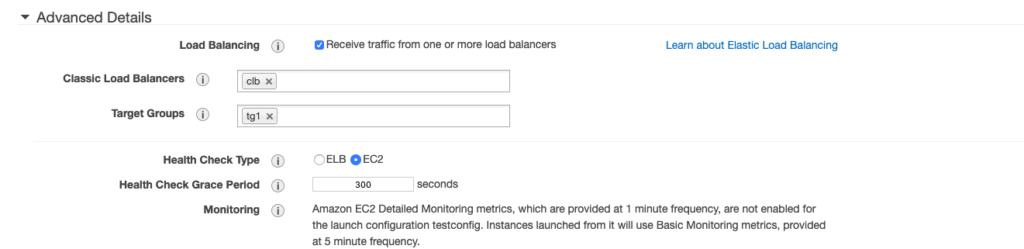
Let’s take a look at how we can create metrics and alerts for EC2 instance. Basic CloudWatch is by default enabled for EC2. You can enable detailed monitoring which will register events every minute, but it is a paid option.

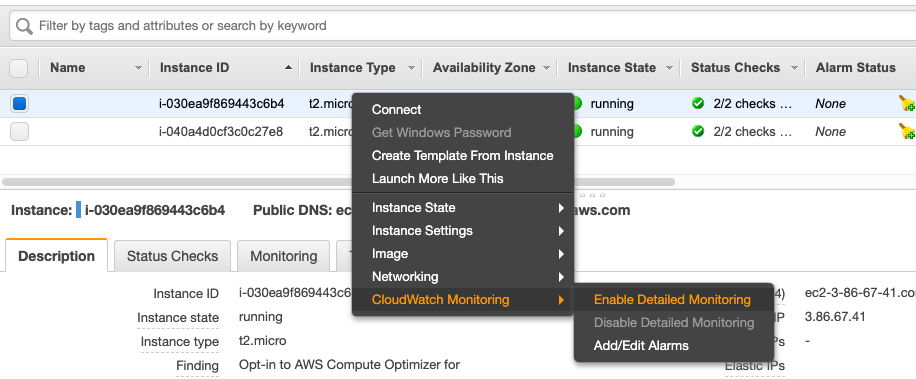
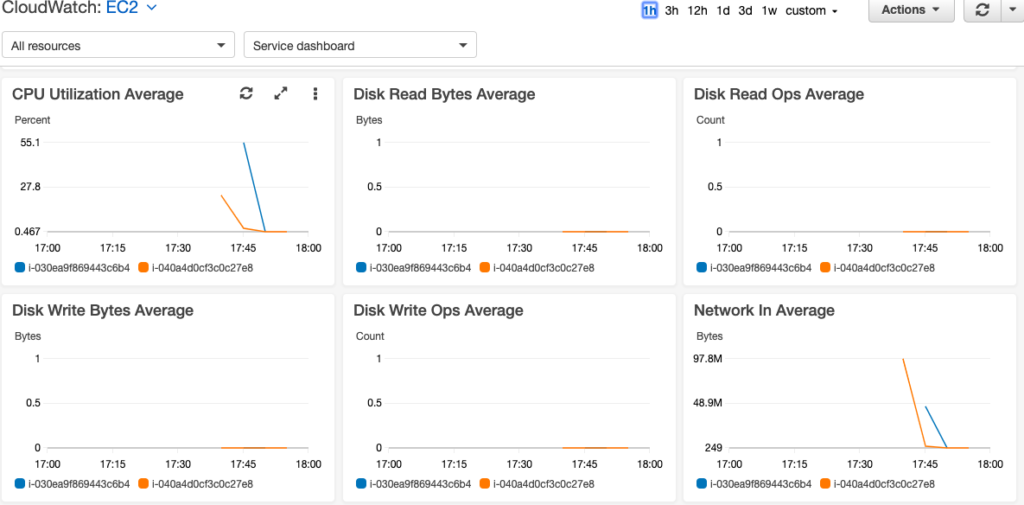
For this example, I will move ahead with basic default monitoring. As I mentioned that default monitoring is enabled by default, so once you go to CloudWatch, select EC2 resources and you will see some default metrics already in place.

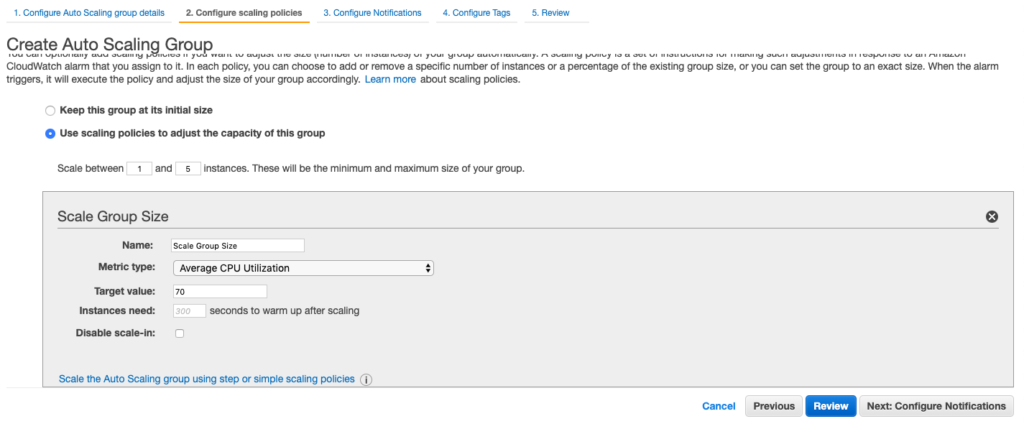
As a next step, we will add Alarms for the instances. You can set up alarms at an individual level, scale group level for autoscale, type of instance, and so on. For the sake of this example, I am choosing a metric of average CPU utilization for all my EC2 instances.

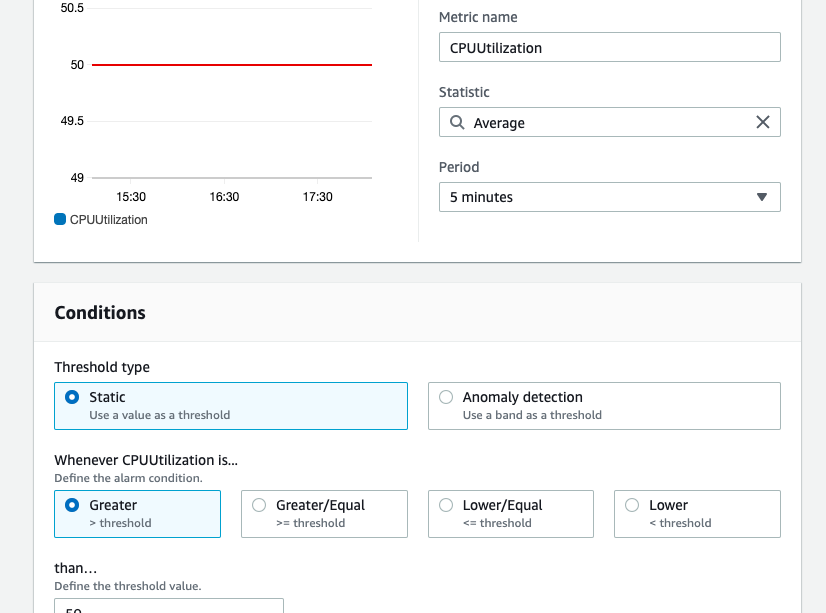
So the alert I am setting says that whenever average CPU utilization for all my instance goes beyond 50% an alarm should be raised. As a result of alarm, I can make the CloudWatch send a message to SNS or Simple Notification Service Queue, from which I can read in some application or serverless function and configure to send email or SMS notifications. One can also set auto-scale options like adding or removing servers or simply restarting an EC2 instance based on the alarm.

AWS Autoscaling application instances

In the last few posts, I have talked about how to host your application on EC2 instance, how to create a replica of application instances, and load-balancing them behind a classic load balancer. The load balancer did help us distributing load among various instances of the application, but that approach had a serious drawback, i.e., you had to have all the instances of application up and running beforehand. We have not thought about money we would be paying extra even if the application load is too low or a situation where our instances will choke when the load is too high.

Autoscaling comes to rescue in such a situation, as the name suggests, you can tell AWS to scale up or down the application instances based on the load coming in for the application. Let’s take a look at how this can be achieved.

To start, go to the “Auto Scaling Groups” option and select the “Create Auto Scaling Group” button. It will ask you to create a Launch Configuration first. This is nothing but a configuration to launch your EC2 instance. Similar to the way we created a replica of EC2 instance, we will select all the options, the only difference is that we are not actually launching an instance at this point, we are just creating a configuration, which will be used by Auto Scaling to create a new instance. Make sure you select AMI, machine type, security group, and key-pair care full to avoid any surprises.

Once you will create and select launch configuration, you will be redirected to create an autoscaling group.

Also at this point, you can specify if your application instances are being accessed through a load balancer.

Next, you can select scaling rules. For example, I can say that a minimum number of instances I want for autoscaling is 1 and the maximum it should go up to is 5. Also, I can say that scale up or down based on a rule that CPU utilization is on average 70%, that is if it goes up to create a new instance and if it goes down, kill an instance, of-course max and min limits will be honored.

You can leave all other options as default or provide settings if needed. Once creates, now your autoscaling group takes care of handling the load for your application, spawning new instances whenever needed maintaining cost-load balance for you.

AWS Classic Load Balancer

Load balancing is a very common need for any production application. In this post, I will try to demonstrate how to use a classic load balancer with AWS to manage load among various EC2 instances. I am using a simple Hello world code here which returns the address of EC2 instance, to distinguish between instances responding.

Here is the code used to return message

@Path("/hello")
public class HelloWorldService
{
    @GET
    public String helloWorld()
    {
    	String address =" IP Address";
    	try {
		InetAddress inetAddress = InetAddress.getLocalHost();
		address = inetAddress.getHostAddress().toString();
	} catch (UnknownHostException e) {
		e.printStackTrace();
	}
        return "Hello World from "+ address + "!!";
    }
}

After creating replicas of the same code, we have 3 instances that have now our code. Next, we need to use a load balancer that can balance out the load among these 3 instances.

Once you click on the “Create Load Balancer” button, you will be given 3 options to choose from. Application load balancer, Network load balancer, and Classic load balancer.

For the sake of this example, we will use Classic Load Balancer. First thing you will need to set the “listener port and protocol” and “target port and protocol”.

After that, you will be asked to provide more information like security groups, health check path and port, instances to be balanced, and so on. Finally, you can review and create the load balancer. Once load balance is created, you will be given a DNS name which you can use to call the service. Also, you can check instances health and set alerts if needed.

In my case, to validate that my load balancer is working, all I need to do is to hit the load balancer URL and check that the IP address returned by the call is changing, showcasing the request is going to a different server.

Amazon EC2: Create Image and Replica instance

There are times when you want to bring up a copy of the instance running on EC2. A common use case can be your in use instance faces some ad-hoc problem and stops responding. You want to bring up the exact replica as soon as possible to minimize the impact on end-users. Fortunately, this can be done easily in a couple of steps.

The first step is to create an image or AMI (Amazon Machine Image). As the name suggests, AMI gives you an image of the current state of the machine. All you need to do to create an AMI is right-click on an EC2 instance, and select option to create the image.

Once the image is created, you will be able to see it under the AMIs section. Creating an instance from Image is equally easy. All you need to do is select the AMI and click launch.

You will need to choose Instance type, security group, key pair, etc just like when creating a new instance. When the instance is launched, you will see it is exact replica of the original image. This can be handy in a situation where your server just went down and you need to bring the application up. You can bring a new replica instance up and assign the Elastic IP, your application is back in minutes.

Amazon EC2: Step by Step guide to setup a Java Application

Here is a step by step guide to set up an EC2 instance, installing the required software and deploying a WAR file.

1. The first step, of course, is to get a new EC2 instance. I am launching a new Ubuntu machine to start with, using a free tier configuration for this demo, with all default values. Make sure you have access to key-pair you are using as you will need to access the machine to install software or create a new key pair.

2. Right-click on the instance just booted, click connect. It will give you details on how to connect to the machine. Follow the instructions and you will be in the machine.

3. Set of commands to get wildfly server up and running on the EC2 machine

sudo apt update

sudo apt install default-jdk

sudo groupadd -r wildfly

sudo useradd -r -g wildfly -d /opt/wildfly -s /sbin/nologin wildfly

Version_Number=16.0.0.Final

wget https://download.jboss.org/wildfly/$Version_Number/wildfly-$Version_Number.tar.gz -P /tmp

sudo tar xf /tmp/wildfly-$Version_Number.tar.gz -C /opt/

sudo ln -s /opt/wildfly-$Version_Number /opt/wildfly

sudo chown -RH wildfly: /opt/wildfly

sudo mkdir -p /etc/wildfly

sudo cp /opt/wildfly/docs/contrib/scripts/systemd/wildfly.conf /etc/wildfly/

sudo nano /etc/wildfly/wildfly.conf

sudo cp /opt/wildfly/docs/contrib/scripts/systemd/launch.sh /opt/wildfly/bin/

sudo sh -c ‘chmod +x /opt/wildfly/bin/*.sh’

sudo cp /opt/wildfly/docs/contrib/scripts/systemd/wildfly.service /etc/systemd/system/

sudo systemctl daemon-reload

sudo systemctl start wildfly

sudo systemctl enable wildfly

sudo ufw allow 8080/tcp

If you try to hit port 8080 of the machine, you will see a default Wilfly page

If you are seeing this page, you know that wildfly is installed properly.

4. Next step is to finally add our war file, for this example, I will just copy the war file to the deployment folder

sudo wget https://war.file.path/HelloWorld.war /opt/wildfly/standalone/deployments/

5. Lastly, we will check our URL and validate

http://ec2.path.url:8080/HelloWorld/rest/hello