Tag Archives: Android

Appcelerator’s Titanium for hybrid apps.

In mobile app development world, debate of hybrid vs native app is an old one. I have built a few native Android apps, and also used a couple of hybrid frameworks like phonegap, titanium and ionic.

Of the hybird frameworks, Appcelerator’s titanium is a bit different because unlike most hybrid frameworks, titanium doesn’t just run the JS/HTML code in a wrapper, it actually creates the native code using the JS code written. This gives the advantage that the app running is actually native app and has all benefits of a native app like better performance and UI using native elements rather that running in a web view. With the advantages, there are ofcourse limitations. As you can imagine that in any other hybrid framework, the underlying code (the layer between the code you write and code that actually gets executed) has to do a little, as at the end of the day, same JS and HTML will be displayed to end user. Whereas in titanium, the framework has to actually convert your JS code to native android/ iOS or Windows code. This means that not all the native features will be easily available, especially for all the OS. So before choosing the Titanium for your app, I will suggest checking if all the features you need are supported by the framework.

Titanium comes in 2 flavors, classic and alloy. Alloy is actually a wrapper over classic which help you write your code in more MVC way by default. Anyone who has worked with JavaScript understands the problem of code getting messy easily because you are not forced to follow any conventions like you have to do in an OOP language. So Alloy will solve this problem for you as code gets organized in MVC (Model, View and Contoller) layers automatically. Furthermore, you can define XML based views in Alloy, which is more intuitive than JS. Again, with ease, there comes a performance lag (I assume Alloy code internally gets converted to classic). Though the performance issue was observed to be negligible for Android and iOS, it was quite visible for Windows.

Well getting started with Appcelerator is not too hard. You can create a test account with http://www.appcelerator.com/. You can download Appcelerator Studio and titanium latest release from the site. The studio is eclipse based, so if you have earlier experience with Eclipse, it will be easier. Next set Android SDK path, Windows->Preferences->Android.

Getting started is fairly simple, New-> Project->Mobile App Project->Default Alloy project

Give details like

Project Name->TestApp
App Id->com.app.testapp

This creates default Hello World project. You can simply right click on the project, Go to “Run As”, it will show you all devices and emulators attached, which you can choose and run the application on, or choose Run configuration to setup a new device.

Coming to the code, if you look at code for newly created project, inside app parent folder, you can see folders like assets, controllers, models, styles, views, i18n etc. Most of these are self explanatory. For the newly created project you can see that Alloy follows convention over configuration, i.e. in controllers we have index.js, styles has index.tss and views has index.xml.

Starting with index.xml,

<Alloy>
<Window class=”container”>
<Label id=”label” onClick=”doClick”>Hello, World</Label>
</Window>
</Alloy>

We are defining a Label, which displays “Hello, World” Message. with onClick method defined.

Now we go to controller index.js, where we see that the onClick method is actually defined. Also note that index.js controller is the starting point of code flow, so it loads the view by “$.index.open();”.

Lastly we can define styling in index.tss, which is more or less css format with a few changes.

Another important file is tiapp.xml where we can define configurations like which all OS will be supported and permissions required for the application.

Android- Select and Upload Image

Here is a simple code to select and upload image from android activity

Add layout as activity_main.xml

<LinearLayout xmlns:android="http://schemas.android.com/apk/res/android"
    xmlns:tools="http://schemas.android.com/tools"
    android:layout_width="match_parent"
    android:layout_height="match_parent"
    android:orientation="vertical"
    android:paddingBottom="@dimen/activity_vertical_margin"
    android:paddingLeft="@dimen/activity_horizontal_margin"
    android:paddingRight="@dimen/activity_horizontal_margin"
    android:paddingTop="@dimen/activity_vertical_margin"
    tools:context=".MainActivity" >

    <ImageView
        android:id="@+id/uploadImage"
        android:layout_width="match_parent"
        android:layout_height="wrap_content"
        android:adjustViewBounds="true" />

    <Button
        android:id="@+id/selectImageButton"
        android:layout_width="match_parent"
        android:layout_height="wrap_content"
        android:layout_marginTop="15dp"
        android:text="Select Image" />

    <Button
        android:id="@+id/uploadButton"
        android:layout_width="match_parent"
        android:layout_height="wrap_content"
        android:text="Upload Image" />

</LinearLayout>

Complete activity class will look like

package com.example.kamalmeet.myapplication;

import java.io.BufferedReader;
import java.io.ByteArrayOutputStream;
import java.io.IOException;
import java.io.InputStream;
import java.io.InputStreamReader;
import java.io.OutputStream;
import java.net.HttpURLConnection;
import java.net.URL;

import org.apache.http.entity.mime.HttpMultipartMode;
import org.apache.http.entity.mime.MultipartEntity;
import org.apache.http.entity.mime.content.ByteArrayBody;
import org.apache.http.entity.mime.content.StringBody;

import android.app.Activity;
import android.app.ProgressDialog;
import android.content.Intent;
import android.database.Cursor;
import android.graphics.Bitmap;
import android.graphics.Bitmap.CompressFormat;
import android.graphics.BitmapFactory;
import android.net.Uri;
import android.os.AsyncTask;
import android.os.Bundle;
import android.provider.MediaStore;
import android.util.Log;
import android.view.View;
import android.view.View.OnClickListener;
import android.widget.Button;
import android.widget.ImageView;
import android.widget.Toast;

public class MainActivity extends Activity {

    private ImageView image;
    private static final int IMAGE_REQUEST_CODE = 10;
    private Button uploadButton;
    private Bitmap bitmap;
    private Button selectImageButton;

    // number of images to select
    private static final int PICK_IMAGE = 1;

    /**
     * called when the activity is first created
     */
    @Override
    protected void onCreate(Bundle savedInstanceState) {
        super.onCreate(savedInstanceState);
        setContentView(R.layout.activity_main);

        // find the views
        image = (ImageView) findViewById(R.id.uploadImage);
        uploadButton = (Button) findViewById(R.id.uploadButton);

        // on click select an image
        selectImageButton = (Button) findViewById(R.id.selectImageButton);
        selectImageButton.setOnClickListener(new OnClickListener() {

            @Override
            public void onClick(View v) {
                selectImageFromGallery();

            }
        });

        // when uploadButton is clicked
        uploadButton.setOnClickListener(new OnClickListener() {

            @Override
            public void onClick(View v) {
                new ImageUploadTask().execute();
            }
        });
    }

    /**
     * Opens dialog picker, so the user can select image from the gallery. The
     * result is returned in the method onActivityResult()
     */
    public void selectImageFromGallery() {
        Intent intent = new Intent(Intent.ACTION_PICK, android.provider.MediaStore.Images.Media.EXTERNAL_CONTENT_URI);
        startActivityForResult(intent, IMAGE_REQUEST_CODE);
    }

    /**
     * Retrives the result returned from selecting image, by invoking the method
     * selectImageFromGallery()
     */
    @Override
    protected void onActivityResult(int requestCode, int resultCode, Intent data) {
        super.onActivityResult(requestCode, resultCode, data);

        if (requestCode == IMAGE_REQUEST_CODE && resultCode == RESULT_OK
                && null != data) {
            Uri selectedImage = data.getData();
            String picturePath="";
            Log.v("************:", "image" + selectedImage);
            String[] filePathColumn = {MediaStore.Images.Media.DATA};

            Cursor cursor = getContentResolver().query(selectedImage,
                    filePathColumn, null, null, null);
            cursor.moveToFirst();

            int columnIndex = cursor.getColumnIndex(filePathColumn[0]);
            picturePath = cursor.getString(columnIndex);
            cursor.close();
            bitmap=BitmapFactory.decodeFile(picturePath);
            image.setImageBitmap(bitmap);


        }
    }


    /**
     * The class connects with server and uploads the photo
     *
     *
     */
    class ImageUploadTask extends AsyncTask<Void, Void, String> {
        private String webAddressToPost = "http://10.0.2.2:8080/GCPWeb/service/uploadImage/";

        // private ProgressDialog dialog;
        private ProgressDialog dialog = new ProgressDialog(MainActivity.this);

        @Override
        protected void onPreExecute() {
            dialog.setMessage("Uploading...");
            dialog.show();
        }

        @Override
        protected String doInBackground(Void... params) {
            try {
                URL url = new URL(webAddressToPost);
                HttpURLConnection conn = (HttpURLConnection) url.openConnection();
                conn.setRequestMethod("POST");
                conn.setRequestProperty("Connection", "Keep-Alive");

                MultipartEntity entity = new MultipartEntity(
                        HttpMultipartMode.BROWSER_COMPATIBLE);

                ByteArrayOutputStream bos = new ByteArrayOutputStream();
                bitmap.compress(CompressFormat.JPEG, 100, bos);
                byte[] data = bos.toByteArray();
                ByteArrayBody bab = new ByteArrayBody(data, "test.jpg");
                entity.addPart("file", bab);

                entity.addPart("someOtherStringToSend", new StringBody("your string here"));

                conn.addRequestProperty("Content-length", entity.getContentLength() + "");
                conn.addRequestProperty(entity.getContentType().getName(), entity.getContentType().getValue());

                OutputStream os = conn.getOutputStream();
                entity.writeTo(conn.getOutputStream());
                os.close();
                conn.connect();


                if (conn.getResponseCode() == HttpURLConnection.HTTP_OK) {
                    return readStream(conn.getInputStream());
                }


            } catch (Exception e) {
                e.printStackTrace();
                // something went wrong. connection with the server error
            }
            return null;
        }


        private String readStream(InputStream in) {
            BufferedReader reader = null;
            StringBuilder builder = new StringBuilder();
            try {
                reader = new BufferedReader(new InputStreamReader(in));
                String line = "";
                while ((line = reader.readLine()) != null) {
                    builder.append(line);
                }
            } catch (IOException e) {
                e.printStackTrace();
            } finally {
                if (reader != null) {
                    try {
                        reader.close();
                    } catch (IOException e) {
                        e.printStackTrace();
                    }
                }
            }
            return builder.toString();
        }

        @Override
        protected void onPostExecute(String result) {
            dialog.dismiss();
            Toast.makeText(getApplicationContext(), "file uploaded",
                    Toast.LENGTH_LONG).show();
        }

    }

}

And in gradle dependencies add

   compile 'org.apache.httpcomponents:httpmime:4.2.3'

Customizing Perspective in Eclipse

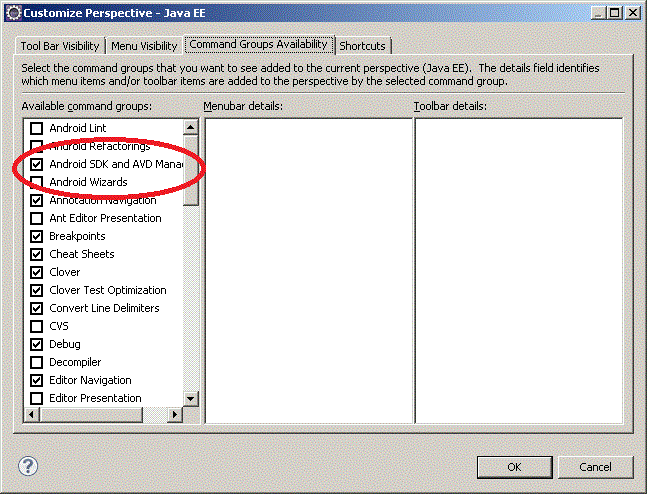
At times you might want to add items/ perspectives into eclipse menus and toolbars. For example, when I installed Android plugin into eclipse, I was not able to find Android SDK and SVD managers in my eclipse. To add these, I had to

Go To Window-> Customize Perspective-> Command Groups Availability

Eclipse

Tech Magic

I remember I watched first movie of Harry Potter series more than 10 years back. I was dazzled by the magic in the movie. Ofcourse I knew it was not real and not possible in real world. For example, I remember one scene which showed newspaper with moving images (don’t remember if that had voice too), and I thought, man that is impossible, how can a video is played over paper.

Shift ten years, a couple of months back I used Times of India alive app on my android phone, which can bring the images on newspaper alive (I created something similar myself using qualcomm’s augmented reality library 🙂 ). Well, it is not exactly same as newspaper playing the video, but is close enough, the video plays on your mobile, but it is triggered by newspaper images. Currently you have click scan button once you take your phone on top of newspaper, but I am sure there is lot of scope for improvement.

My point here is that what used to look like impossible has been rapidly transformed to mundane with use of technology. This is the most exciting time to be alive.


TrueCaller: App to keep away unwanted calls

A couple of months back I was introduced to truecaller app https://play.google.com/store/apps/details?id=com.truecaller&hl=en.

“Truecaller is the world’s largest collaborative phone directory that makes it easy to get in touch with people across the globe.”

I had tried many similar apps before this which claim to show caller’s info, but none comes close to this one. This app shows location and name of the caller (well 60-70% of the time, else it will show no info available). Most importantly the app has saved me  taking unwanted calls as it shows the info about the caller like “credit card”, “customer care”, which helps me judge if I want to take the call.

Agile Mobile Development

One of the best candidates for agile development I have found is mobile app development. Why?

1. Requirements are usually not very clear as mobile app development itself is relatively new- so client demos and regular feedback helps us not to move away from what is required.

2. The mobile technologies have not been explored as much as we have already explored web technologies, so we still have lot of challenges to be faced. This means peer reviews and pair programming can be very helpful.

3. The apps are generally UI extensive, that means they are good candidates for client feedback. We need to get clarity on look and feel, and specially responsiveness of the app.

4. With frameworks like phonegap available and newly emerging augmented reality libraries, complex mobile apps are normally started in POC (proof of concept) mode. With hit and try approaches, it is good to have daily discussions to float ideas and get feedbacks within the teams.

Refer : http://kamalmeet.com/2013/06/agile-development-what-is-it/
http://kamalmeet.com/2013/06/agile-development-is-it-for-me/


Samsung Galaxy Note 2

I have been using samsung galaxy note 2 for more than 6 months now, so thought of sharing some highlights which might help others in making a choice when buying a similar phone.

Screen Size: This is the best thing about this phone. The phablet provides you with a screen in which reading emails/ ebooks is very easy. For the first time I am able to read ebooks so easily on my phone.

Sleek: When I bought note 2, I had a doubt that if it will be easier to carry it along because of the screen size. But sleek width and light weight helps me carry it easily in my pocket.

Speed: Another good thing about this 1.6 GHz phone is I have never seen this slow down or hang, no matter how many applications are in process.

Battery Life: Amazingly the phone’s battery life is much better than I expected. My last Android phobe had a battery life of 1.5 days, but note 2, even with a big screen, can give me more than 2 days easily with regular usage.

Navigator: The big screen helps me use navigate feature of android very easily, it has helped me find out easy routes and alternatives for many destinations.

Camera: With 8 Megapixel camera and great flash, I have not carried a camera in any of my trips since I bought this phone.

Android app: out of memory exception

An android app has some limitations when it comes to memory availability. Unlike a normal Java app, you do not have luxury of expanding memory your application uses, as it will be completely dependent on the device on which the app is running, memory available in the phone, number of applications running simultaneously. We will not have control over these external factors so we will need to optimize memory usage on our end.

Some of the techniques I used in one of my last projects which used a lot of images/ bitmaps and hence ran into many memory issues.

  • Use of flags: Set android:hardwareAccelerated=”true” and android:largeHeap=”true” flags in manifest file. Downside is that these flags are only available after android 3.0. More than 50% of android devices still run on gingerbread (2.3+), so this is not a very reliable solution if you are targeting a larger audience. Though worth a try for high end (3.0+) devices.
  • Memory leakage: DVM grabage collection works n principle of JVM garbage collection, that is it will reclaim the memory for an object if there is no reference to it. So make sure when you are done with an object and do not need it anymore, mark the object reference as null.
  • Use minimum space for an object: Design your classes intelligently, for example if you are handling student data and you address details will not be used frequently, create a separate class and initialize the object only when it is required. Remember, if a char can work, don;t use int or long.
  • Objects are always placed on heap: One of my colleagues was wondering that how can an object occupy space, after the method exits, if the object is declared inside a method. Remember, only references are stored in the stack for method, the actual object is always stored in the heap. So the memory will be freed only when next cycle of garbage collection occurs
  • Use Garbage collection: You can call system.gc(); to initiate garbage collection, but this only suggests JVM/DVM to run a garbage collection, you cannot force it.
  • Playing with Bitmaps/ Images: Bitmaps and images take highest amount of memory, so make sure you recycle() bitmaps as soon as you are done using it. Make sure you have removed all references (imageviews/ objects) to bitmap before calling recycle().
  • Handle Activity Stack: If the app can be used back and forth multiple times, it is better to handle the back-front flow in the code, as default back button handling in android needs to keep a tack of activity stack and uses memory for that. Simplest will be to call previous activity on back button through code and always finish current activity before moving to next.

Accessing localhost from virtual machine or Android Emulator

Two problems- one solution i.e. 10.0.2.2

Sometime back, I faced an issue that I had installed a virtual machine on mu linux machine. I had a server/ website running which I wanted to access from virtual machine. http://localhost/site simply refused to work. A little googling helped with an answer to use http://10.0.2.2/site

Again faced similar issue. Was trying to access local website from within android emulator. Again localhost refused to work. And guess who was the rescuer? yep 10.0.2.2 again 🙂