AWS Autoscaling application instances

In the last few posts, I have talked about how to host your application on EC2 instance, how to create a replica of application instances, and load-balancing them behind a classic load balancer. The load balancer did help us distributing load among various instances of the application, but that approach had a serious drawback, i.e., you had to have all the instances of application up and running beforehand. We have not thought about money we would be paying extra even if the application load is too low or a situation where our instances will choke when the load is too high.

Autoscaling comes to rescue in such a situation, as the name suggests, you can tell AWS to scale up or down the application instances based on the load coming in for the application. Let’s take a look at how this can be achieved.

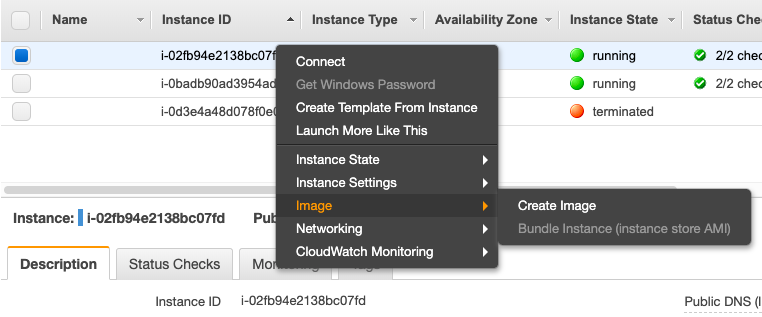
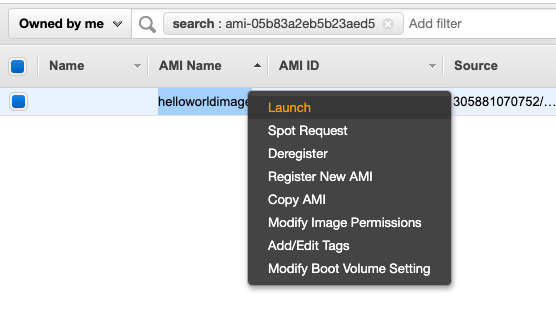
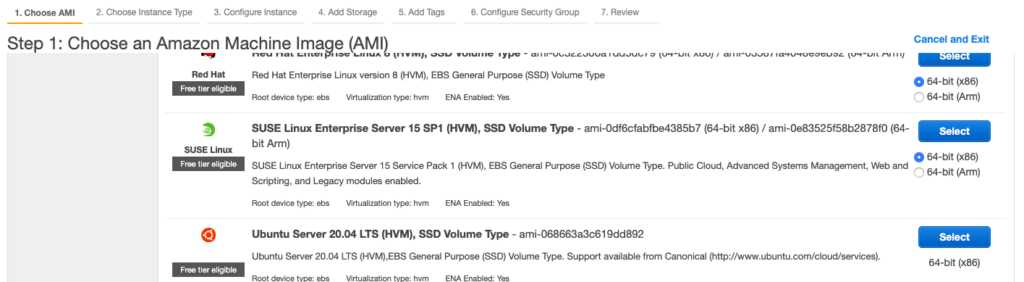
To start, go to the “Auto Scaling Groups” option and select the “Create Auto Scaling Group” button. It will ask you to create a Launch Configuration first. This is nothing but a configuration to launch your EC2 instance. Similar to the way we created a replica of EC2 instance, we will select all the options, the only difference is that we are not actually launching an instance at this point, we are just creating a configuration, which will be used by Auto Scaling to create a new instance. Make sure you select AMI, machine type, security group, and key-pair care full to avoid any surprises.

Once you will create and select launch configuration, you will be redirected to create an autoscaling group.

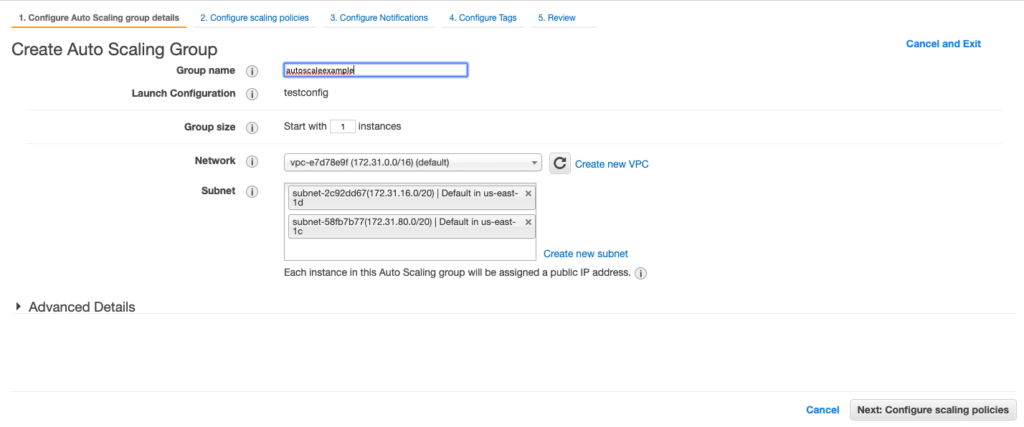
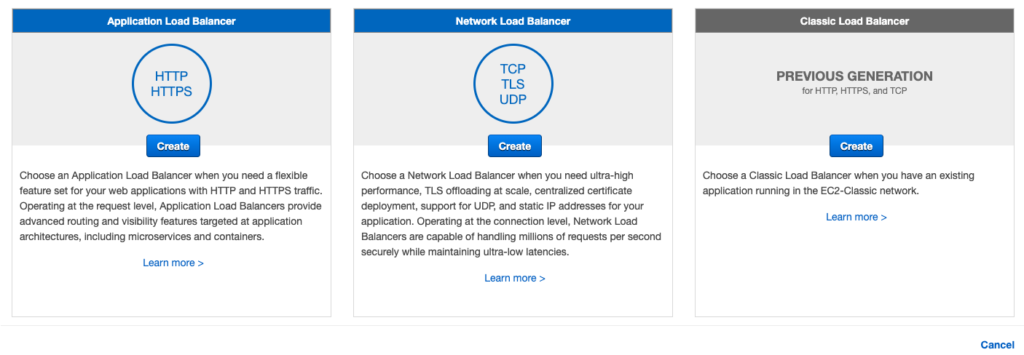
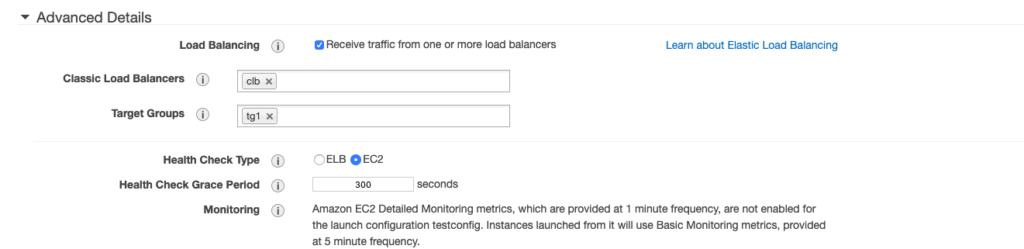
Also at this point, you can specify if your application instances are being accessed through a load balancer.

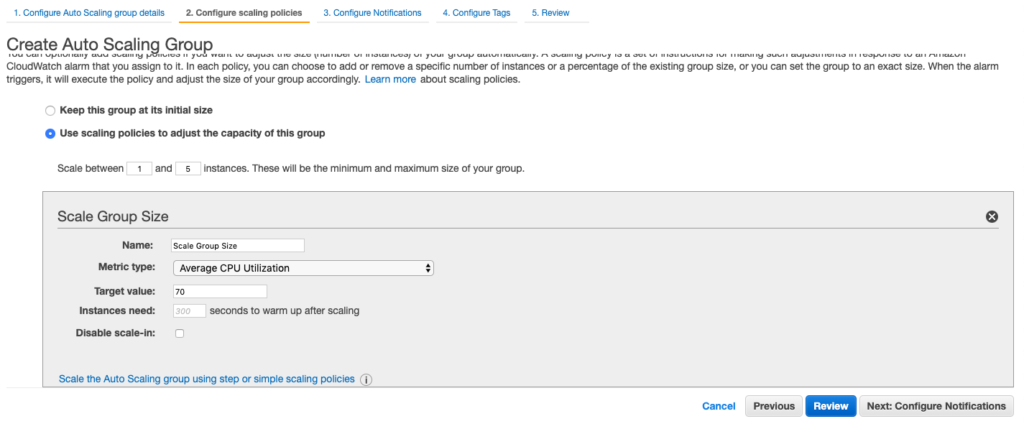
Next, you can select scaling rules. For example, I can say that a minimum number of instances I want for autoscaling is 1 and the maximum it should go up to is 5. Also, I can say that scale up or down based on a rule that CPU utilization is on average 70%, that is if it goes up to create a new instance and if it goes down, kill an instance, of-course max and min limits will be honored.

You can leave all other options as default or provide settings if needed. Once creates, now your autoscaling group takes care of handling the load for your application, spawning new instances whenever needed maintaining cost-load balance for you.

AWS Classic Load Balancer

Load balancing is a very common need for any production application. In this post, I will try to demonstrate how to use a classic load balancer with AWS to manage load among various EC2 instances. I am using a simple Hello world code here which returns the address of EC2 instance, to distinguish between instances responding.

Here is the code used to return message

@Path("/hello")
public class HelloWorldService
{
    @GET
    public String helloWorld()
    {
    	String address =" IP Address";
    	try {
		InetAddress inetAddress = InetAddress.getLocalHost();
		address = inetAddress.getHostAddress().toString();
	} catch (UnknownHostException e) {
		e.printStackTrace();
	}
        return "Hello World from "+ address + "!!";
    }
}

After creating replicas of the same code, we have 3 instances that have now our code. Next, we need to use a load balancer that can balance out the load among these 3 instances.

Once you click on the “Create Load Balancer” button, you will be given 3 options to choose from. Application load balancer, Network load balancer, and Classic load balancer.

For the sake of this example, we will use Classic Load Balancer. First thing you will need to set the “listener port and protocol” and “target port and protocol”.

After that, you will be asked to provide more information like security groups, health check path and port, instances to be balanced, and so on. Finally, you can review and create the load balancer. Once load balance is created, you will be given a DNS name which you can use to call the service. Also, you can check instances health and set alerts if needed.

In my case, to validate that my load balancer is working, all I need to do is to hit the load balancer URL and check that the IP address returned by the call is changing, showcasing the request is going to a different server.

Amazon EC2: Create Image and Replica instance

There are times when you want to bring up a copy of the instance running on EC2. A common use case can be your in use instance faces some ad-hoc problem and stops responding. You want to bring up the exact replica as soon as possible to minimize the impact on end-users. Fortunately, this can be done easily in a couple of steps.

The first step is to create an image or AMI (Amazon Machine Image). As the name suggests, AMI gives you an image of the current state of the machine. All you need to do to create an AMI is right-click on an EC2 instance, and select option to create the image.

Once the image is created, you will be able to see it under the AMIs section. Creating an instance from Image is equally easy. All you need to do is select the AMI and click launch.

You will need to choose Instance type, security group, key pair, etc just like when creating a new instance. When the instance is launched, you will see it is exact replica of the original image. This can be handy in a situation where your server just went down and you need to bring the application up. You can bring a new replica instance up and assign the Elastic IP, your application is back in minutes.

Amazon EC2: Step by Step guide to setup a Java Application

Here is a step by step guide to set up an EC2 instance, installing the required software and deploying a WAR file.

1. The first step, of course, is to get a new EC2 instance. I am launching a new Ubuntu machine to start with, using a free tier configuration for this demo, with all default values. Make sure you have access to key-pair you are using as you will need to access the machine to install software or create a new key pair.

2. Right-click on the instance just booted, click connect. It will give you details on how to connect to the machine. Follow the instructions and you will be in the machine.

3. Set of commands to get wildfly server up and running on the EC2 machine

sudo apt update

sudo apt install default-jdk

sudo groupadd -r wildfly

sudo useradd -r -g wildfly -d /opt/wildfly -s /sbin/nologin wildfly

Version_Number=16.0.0.Final

wget https://download.jboss.org/wildfly/$Version_Number/wildfly-$Version_Number.tar.gz -P /tmp

sudo tar xf /tmp/wildfly-$Version_Number.tar.gz -C /opt/

sudo ln -s /opt/wildfly-$Version_Number /opt/wildfly

sudo chown -RH wildfly: /opt/wildfly

sudo mkdir -p /etc/wildfly

sudo cp /opt/wildfly/docs/contrib/scripts/systemd/wildfly.conf /etc/wildfly/

sudo nano /etc/wildfly/wildfly.conf

sudo cp /opt/wildfly/docs/contrib/scripts/systemd/launch.sh /opt/wildfly/bin/

sudo sh -c ‘chmod +x /opt/wildfly/bin/*.sh’

sudo cp /opt/wildfly/docs/contrib/scripts/systemd/wildfly.service /etc/systemd/system/

sudo systemctl daemon-reload

sudo systemctl start wildfly

sudo systemctl enable wildfly

sudo ufw allow 8080/tcp

If you try to hit port 8080 of the machine, you will see a default Wilfly page

If you are seeing this page, you know that wildfly is installed properly.

4. Next step is to finally add our war file, for this example, I will just copy the war file to the deployment folder

sudo wget https://war.file.path/HelloWorld.war /opt/wildfly/standalone/deployments/

5. Lastly, we will check our URL and validate

http://ec2.path.url:8080/HelloWorld/rest/hello

Azure Security Center

Security is one of the most important aspects of any application. When you deploy an application on the cloud, you have to make sure you handle security at multiple levels including computing infrastructure, storage, database, application level and so on. Azure Security Center is a tool that can help you assist in your quest for absolute security for your applications. The tool comes free with Microsoft Azure account and can help you understand if any of your resources or applications need attention.

The image above of the Security Center shows us how we can easily get a high-level view of our security. It gives us actionable recommendations like- if we need to turn on encryption on some of our resources and if some API is exposed to the public which should be controlled.

The video below gives us additional view of security center usage

Managed Identities for Azure Resources

In my last post I talked about how one can use Azure Active Directory to manage user access for various resources. But it is not only users who need access to resources, there are times when your application code needs to access cloud resources. Your application might need access to key-vaults, databases, storage, etc. This can be managed in a similar manner we managed access for users using Managed Identities. Basically we give our application or resource an identity, and using the identity it can access any cloud resource like key-value just like a user.

Managed service identities and Azure VMs

image source: https://docs.microsoft.com/en-us/azure/active-directory/managed-identities-azure-resources/overview

The image above shows how a resource with manage identity can get a token from Azure AD, and further use this token to access a cloud resource which gives permission to that identity.

Here is a video explaining the concept in detail

Here are a few key terms you need to understand

An “Identity” is a thing that can be authenticated.

A “Principal” is an identity acting with certain roles or claims.

A “Service Principal” is an identity that is used by a service or application. It can be assigned roles.

Managed Identity” is an identity created for a service, which is like creating an account on Azure AD tenant. Azure infrastructure will automatically take care of authenticating the service and managing the account.

Azure Active Directory

Azure Active Directory or AAD as it is commonly known, is a powerful tool that helps manage users and their access. Let us start by taking a look at official definition by Microsoft

Azure Active Directory (Azure AD) is Microsoft’s cloud-based identity and access management service, which helps your employees sign in and access resources in:

  • External resources, such as Microsoft Office 365, the Azure portal, and thousands of other SaaS applications.
  • Internal resources, such as apps on your corporate network and intranet, along with any cloud apps developed by your own organization.

Reference: https://docs.microsoft.com/en-us/azure/active-directory/fundamentals/active-directory-whatis

Additionally

The Azure Active Directory (Azure AD) enterprise identity service provides single sign-on and multi-factor authentication to help protect your users from 99.9 percent of cybersecurity attacks.

Reference: https://azure.microsoft.com/en-in/services/active-directory/

One key term here “Single Sign On” or SSO. Let’s assume that you work for a company which requires you to access multiple applications for example, your email, an HR system, a leave management system, a project management system, an employee directory and so on. Now think of a scenario when you are required to sign into all these applications independently. For each application you have a separate set of credentials, that you need to remember and hence weaken the security. Additionally managing access is also difficult for admins as in scenario when an employee leaves the company or joins the company, an admin ends up adding or removing credentials to multiple applications, which again is error prone.

To handle such problems, Single Sign on provides us with a mechanism to manage user identities in a single place and provide or manage access to different applications. Azure Active Directory is such a system helping manage user identities at one place and control access to various applications and resources on cloud.

We can see Azure provides us with a very simple way to create Azure Directories, manage users, groups and roles. In addition it also allows you to manage the user, setting like if user needs multi-factor authentication, if user is located in a specific country and can login for there only, etc.

Designing for Performance and Scalability

When one thinks about deploying an application to Cloud, the first advantage that comes to mind is scalability. A proper word would be Elasticity, which implies that application can both scale in and scale-out. When talking about scalability, we can scale an application in two ways

Vertical Scaling: Also known as scaling up would mean adding more physical resources to the machine, for example, more RAM or CPU power to existing boxes.

Horizontal Scaling: Also known as scaling out would mean adding more boxes to handle more load.

Here are some common design techniques help us manage performance and scalability of a system

Data Partitioning: One traditional problem faced with performance and scalability is around data. As your application grows and the size of your data gets bigger, executing queries against it becomes a time-consuming job. Partitioning the data logically can help us scale data and keeping performance high at the same time. One example can be to manage data for different geographies in different data clusters.

Caching: It is an age-old technique for making sure our system performs fast. Cloud provides us out of the box caching mechanisms like Redis cache which can be used off the shelf and help us improve performance.

AutoScaling: Cloud service providers help us autoscale horizontally based on rules. For example, we can set a rule that when average CPU usage of current boxes is beyond say 70%, add a new box. We can also have rules for scale in like if the average CPU usage is below 50%, kill a box.

Background Jobs: Move the code which can be managed asynchronously and independently like reports generation or AI model execution to batch jobs or background jobs. This will help manage the performance of core application features.

Messaging Infra: Again use Messaging or Queue based communication for asynchronous tasks. Services handling messages can scale up or down based on need.

Scale units: At times you will feel that when scaling up you need to scale more than just virtual machine, for example, an application uses X web servers, Y queues, Z storage accounts, etc. We can create a unit consisting of the infra need and scale resources as a unit.

Monitoring: Have performance monitoring in place to make sure your application and services are following SLAs. Monitoring will also help us identify problem areas, for example, one service might be slowing down the whole system.

Common Security Threats

In the last post, I talked about some of the design areas one needs to consider when designing an application for Cloud. Here I will talk about some of the very common threats that an architect one should consider when designing the system.

Physical Layer Access: At the lowest level of security, one needs to consider the fact that physical machines can be accessed and tampered with. This is more possible when we have on-premise hardware infrastructure than on the cloud. But even when one is choosing a cloud platform, it makes sense to understand and question the level of physical security implemented by the cloud service provider to avoid any unauthorized access.

Virtual Access: The next level of access is someone gaining virtual access to the machines manually, programmatically or through malware. Basic techniques like using a Virtual Network to isolate data and code machines, using Identity Management and Role-based access to make sure only authorized personals or code can access data, having security groups and firewalls in place and making sure security patches and antivirus definitions are always updated can help mitigate this threat.

Manual Errors: A misconfiguration causing a VM exposed through unwanted open ports can be another problem. Implementing infrastructure as a code where automated scripts are responsible for creating and maintaining infrastructure can be helpful in avoiding manual errors.

Weak Encryption: Though most cloud service providers give us options to encrypt our data, filesystems, and disks, it is the responsibility of the architect to make sure strong encryption is implemented. Tools like Key Vault services can help to store encryption keys to avoid manual handling. Also, all your APIs and pages dealing with important data should use HTTPS (Secured) protocol.

Application Layer Attacks: Common attacks like Code Injections, SQL Injections and Cross-Site Scripting (XSS) can be targeted towards the application. It is the responsibility of the architect and development team to make sure best practices are followed while writing the code to tackle these attacks.

Perimeter Layer Attacks: DDOS or Distributed Denial Of Service is a common attack used by hackers to bring an application down. Most cloud service provider gives you out of the box solutions which can help manage these threats.

Designing for Security in Cloud

At times we hear news like data by a big software company was compromised. Cloud gives us a lot of capabilities, but along with that comes certain vulnerabilities. As now anyone can access resources on the cloud, it is important that proper security measures are thought of while designing the system. Let’s take a look at some of the core security areas to be considered when designing for Cloud

Infrastructure Access: Who can access a service or a filesystem or a database. What kind of access is required? How can the resources be accessed? One needs to answer these questions before getting started with the application development process. Role-based access is an important tool that can help architects making sure proper security. For example, a user or an application might just need read access on file system or database, then rules should not allow any read or update access.

Traceability: Most cloud service providers allow you to see any changes being done on infrastructure. You can monitor which resources were updated by whom and when.

Layered Approach: When implementing security, most cloud service providers encourage layered approach. That is, implement security rules at different layers like a load balancer, application server, application code, database and so on. So that even in case one layer is compromised, your core application and data are still secured.

Encrypt Data at rest and transit: cloud service provider providers mechanism to secure your data at rest and in transit. Encryption is one big tool in your arsenal, for example, a simple step of using HTTPS against HTTP will ensure your data is encrypted and secured while in transit. Similarly, most cloud service providers have encryption available of disks and databases to help secure the data.

Data type specific security: You also need to understand that there will be certain needs specific to the type of data you are storing, for example, if you are storing healthcare-related data, you will need to understand HIPAA (Health Insurance Portability & Accountability Act) needs, for finance-related data you might want to check PCI (Payment Card Industry) data standards. Also, there might be region-specific needs like in Europe we have GDPR or General Data Protection Regulation for personal data.